


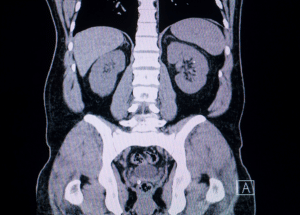
Urography, also termed intravenous pyelography (IVP) or excretory urography (EU) is an imaging diagnostic technique to visualise human anatomy and function of the urinary system in the early 20th century.
At first, it required the administration of contrast media intravenously where these are filtered by the kidneys and excreted through the urinary system to obtain X-ray pictures of the kidneys, ureters and bladder.
The method quickly gained popularity as a non-invasive means of diagnosing urinary tract obstruction, kidney stones, ureteral tumors, congenital anomalies and other diseases of the genitourinary system. However, with advances in technology came access to more sophisticated imaging modalities such as CT and MRI. These new technologies provided better resolution, more detailed anatomical perspectives and functional information and they have gradually displaced conventional excretory urography in many clinical environments.
EU commonly called intravenous pyelography (IVP) employs conventional radiographic machines that take several pictures of the kidneys, ureters and bladder. Oblique views also assist in giving additional information especially when evaluating abnormal calcifications. Due to the better availability of the multidetector CT scanners, CT urography has been evaluated for its effectiveness as an imaging modality.
Multiple detector systems enable the isotropic volume acquisition which can be reconstructed as axial, coronal, sagittal and 3D ones. These images can be manipulated and reviewed at CT scanner workstation, stand-alone computer systems or in PACS system environment. 1.5 T machines have been investigated extensively in MR urography, while 3.0 T MR systems have been examined as well. Nevertheless, no differences in image quality have been compared between 1.5 T and 3.0 T systems and some problems might be associated with application of 3.0 T systems such as, for example, increased T1 relaxation time and higher artifacts.
While some consider essential the process of compression in the accomplishment of urographic imaging, others turn to other ways to visualize the ureters. Compression devices are available in different design; there are those that enclose the patient and others that are fixed on the exam table. Interestingly, in EU, a patient can be positioned in several ways nonetheless the patient comfort level or capabilities of the radiographic equipment.
Patient preparation
Anaesthesia
Rarely the adult patients requiring urographic procedures will require anaesthesia no matter the imaging technique chosen. On the other hand, children who need to undergo MR urography mainly need to be sedated. For this reason, several facilities engage the services of anaesthesia staff to offer these tests.
Patient position
For CT and MR urography, it is suggested that patients lie flat on their back with their hands placed above their head. This configuration assists in avoiding beam hardening artefacts in CT scans to some extent and prevents wrap-around artefacts in MR images.
Step 1-Patient Preparation: Advise the patient to take one bottle of the magnesium citrate oral solution. This works as a purge to empty the bowel, thus ensuring that any renal, ureteral or bladder calcifications are not concealed by fecal matter. Inform the patient not to take any food or fluids. Make sure blood pressure and almost all laboratory results are within normal range of renal function and get the latest pregnancy test if relevant.
Step 2-Preliminary Imaging: Perform an initial KUB with a regular 14×17 inch cassette during inspiration while aligning the top edge of the cassette with the iliac crest. The radiologist also inspects the radiograph and determines the global or equivalent field of view to check whether it is sufficient and comments on calcifications.
Step 3-Contrast Injection: After the preliminary imaging is felt to be adequate, insert a peripheral intravenous line. Administer 2 x 50mL syringes of Omnipaque 300 contrast medium with force.
Step 4-Radiographs After Contrast: Perform a cone-down radiograph with the kidneys in full expiration at 1-minute post-injection. After exactly 3 minutes, KUB radiograph should be performed completely.
Excretory urography
Step 5-Compression Application: If there are no contraindications, place the patient prone on a compression paddle over the patient’s upper abdomen to provide a clear view of the renal collecting system. Following compression, obtain further anteroposterior cone-down view of the kidneys and bilateral oblique view images.
Step 6-Evaluation of Images: The radiologist goes through the images. An optimal opacification of the collecting systems should be seen, then the compression paddle is released, and a follow-up KUB radiograph is made. In some cases, a post-void cone-down radiograph of the bladder may be useful in frontal and oblique positions.
Step 7-Modification for UPJ Obstruction: When assessing patients with potential ureteropelvic junction obstruction, address them about Lasix allergy. If no prior history of allergic reaction, administer lasix at 0.5mg/kg up to 40mg given 15-20 minutes after the first contrast agent injection. Take KUB X-rays at 5, 10, and 15 min after giving Lasix’s injection. When more than 50% of the collecting system is not cleared by the 10-minute mark may indicate UPJ pathology.
CT Urography
Step 1-Pre-Examination Preparation: Patient should be advised to take sufficient fluids before the CT exam to minimize contrast induced nephropathy. A study shows that oral hydration is inexpensive and offers comparable levels of ureteral filling and contrast enhancement as IV techniques. It is also important that all the metallic objects should be avoided near the area of interest to reduce beam hardening artefacts. Place an infusion of peripheral veins before starting the examination. Place the patient in a supine position on the table with their arms raised above the head.
Step 2-Initial Imaging:
Scout Radiograph: Take a digital scout radiograph to ensure that the whole area from the diaphragm up to the iliac crest crests is covered.
Non-Contrast CT scan: Order a non-contrast CT abdomen and pelvis for the patient from the level of renal arteries to the level of the pubic symphysis using specific technical parameters including 120 KVp, dose modulated scan and 3.75 mm thickness of scan.
Step 3-Contrast Injection:
Administer 120 mL of IV contrast (or 85 mL in patients with one kidney) with a flow not exceeding 2–3 mL/sec; obtain a nephrographic phase scan after a 100-second delay.
Step 4-Post-Contrast Imaging:
Give 200 mL of saline injected after the first contrast injection as a bolus. Make the patient sit up for approximately 8 minutes to allow reabsorption of the free fluid, then lie flat to obtain a second scout radiograph. A delayed excretory phase should be acquired approximately 10 minutes after the contrast injection to demonstrate the ureters and the bladder. Produce sagittal and coronal reformation images and produce 3D volume rendered images by using a separate workstation.
Step 5-Alternative Technique (Split dose):
In patients less than 40 years old, use the ‘split dose’ procedure where a single dose of contrast is divided. Use the same technique as the standard work-up starting with a scout radiograph and non-contrast CT scan.
Administer 75 mL of a non-iodinated contrast then give a saline load of 150 mL. Wait for 8 minutes and give another 75 ml of non-iodinated contrast and 50 ml saline bolus.
Wait for approximately 100 seconds, then take the CT scan at the correct parameters.
Step 6-Data Processing: Supply volume data primarily with 0.625-mm axial slices and reformat 3.75-mm axial slices for diagnostic read by radiologist. Morrison et al, in their study, demonstrated that the single-bolus CT approach provided lower rates of repeat excretory phases and patient scan time savings for patients older than 50 years with only minimal addition of radiation dose.
Magnetic Resonance Urography
Step 1-Patient Preparation: Give IV fluids prior to the exam. Insert a urinary catheter which will facilitate the imaging process. Give diuretics during the exam to improve the assessment of the renal function.
Step 2-Imaging Protocol: Structural characterization can be done by T2-weighted images, and functional evaluations by dynamic post-contrast images. Data derived from images include contrast transit times and differential renal function.
Step 3-Early Techniques: The MR urography in the earlier years mainly relied on T2-weighted images since high signal intensity was obtained with urine. This enabled rapid imaging in any plane but only for patients who had an enlarged collecting system.
Step 4-Excretory MR Urography: Like CT urography, a gadolinium-based contrast agent is given with imaging performed in the excretory phase. Thus, low dose gadolinium is mostly administered to prevent T2 effects due to concentrated contrast in urine. Give IV diuretics to improve the study done during imaging.
Step 5-Imaging Sequences: The most basic scan is a 3D gradient echo in and out plane that suppresses fat signal. Elective breath-hold acquisitions are made to reduce the effects of motion. It is recommended to use both T1- and T2-weighted sequences in axial and coronal positions for an accurate assessment. Contrast administration follows the T2-weighted images to prevent distortion of the signal’s quality.
Step 6-Post-Contrast Imaging: The radiologist scans T2-weighted images to look for possible obstructions in the initial scans. If none is detected, an IV Lasix (furosemide) might be administered to aid in clearance. Conversely, in comprehensive study, the examination takes approximately 30-60 minutes, while singly focused study can take 15-30 minutes. Follow up imaging is performed at 3 minutes and 7 to 10 minutes post-contrast and both axial and coronal views are captured.
Step 7-Pediatric Considerations: MR urography can be performed at 1.5 T or 3 T in children and 3 T offers better image quality and detail. While 1.5 T magnets are relatively less sensitive to artifacts.
Magnetic resonance imaging
LEARNING & CME
View All
Advanced
Cardiovascular
Life Support
Basic Life
Support

Pediatric
Advanced Life
Support

Neonatal
Resuscitation
Program

Annual Stroke
Center
Continuing
Education

Opioid and Pain
Management

National
Institutes of
Health Stroke
Scale

Basics of
Electrocardiography