


Central venous catheterization is a routine procedure in the intensive care and operative units to administer drugs, fluids and blood products and to measure central venous pressure. Such catheters have traditionally been placed based on the landmarks. However, this practice has potentially hazards associated with it due to higher incidences of complications in patients with difficult anatomy or emergent cases. Central line placement with the aid of real-time ultrasound is essentially ultrasonography-assisted central line placement. In this manner, ultrasound has significantly minimized risks like arterial puncture, formation of hematoma, pneumothorax, and catheter malposition by providing direct visualization of vascular structures.
High-Frequency Linear Probe
Linear transducer
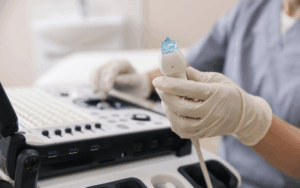
High frequency liner transducer
Dilator
Scalpel
Guidewire
Needle/Syringe
CVC Catheter (e.g., triple lumen or dialysis catheter)
Central Venous Catheter Kit
Ultrasound Gel
Patient preparation:
Confirm the patient’s identity and the reason for insertion of a central line.
Obtain informed consent from the patient that should involve the risks, benefits, and alternatives of the procedure.
The patient should also be educated to use ultrasound in increasing safety with fewer complications.
Pre-procedure monitoring:
Connect the patient to continuous monitoring: This includes continuous ECG, pulse oximetry, and non-invasive blood pressure monitoring.
Patient position:
Internal Jugular (IJ) Approach: Place the patient flat supine and make a slight Trendelenburg position to increase visibility of centrally located veins and minimize possibility of air embolism.
Subclavian or Femoral Approach: For subclavian access, the patient lies flat on a bed, limbs at the sides of the body.
The patient must lie on his back with the legs slightly apart when accessing through femoral approach.
Step 1: Patient positioning Preparation & Setup: The patient is usually placed in Trendelenburg position (head down tilt) to ensure dilation of the internal jugular vein selected or any other vein.
Ultrasound Machine Setup: It should be in a way that the operator of the ultrasonic machine gets to see the screen well while positioning the probe and needle.
Step 2: Probe Choice and selection: For the examination of veins such as IJV a 7.5-10 MHz linear transducer is preferred while a curvilinear transducer is best suited for femoral or subclavian veins. Apply sterile gel and put on a sterile sheath that assists in developing an aseptic plane around the placed probe.
Step 3: Anatomical Identification: First parameter to assess is the intended vessel, in most cases internal jugular vein in internal jugular central line insertion. So, you should use short axis view or transverse view this will give circular shape compressible vein separate it from the rigid artery. Like first pass imaging, one should use the long axis view or longitudinal imaging plane so that the needle and vein will be in vision as the puncture is being made.
Step 4: Real Time Needle Guidance: The dynamic technique needs real time visualization of the ultrasound to enable one to have a chance to see the needle once it is inserted into the skin and as it advances towards the target vessel.
Short-Axis View: In transverse plane, you see the needle as a cross-sectional point when it advances into the vein. This one is good in visualizing the vessel and useful in maintaining the position of the needle tip in the ultrasound plane.
Long-Axis View: In the longitudinal plane the length of the needle and the path is displayed completely, and position may be viewed to ensure against misplacement and observe the depth of needle. Withdraw the needle a little that only the needle’s tip is now within the lumen of the vessel.
Step 5: Confirmation of Placement:
Pump the syringe gently to check whether the needle is in the vein and take aspirated venous blood.
After the removal of the needle, the position of the guidewire can also be confirmed by using the long axis view in the ultrasound.
Step 6: Completion of Procedure:
Lastly, once it can be ascertained the desired cannulation has been achieved, the catheter is advanced over the guidewire. But use ultrasound for the second time to avoid complications that may result from hematoma or arterial puncture.
- Complications
Arterial puncture: Injury to adjacent structures (carotid or subclavian artery) may occur by puncture in association with the ultrasound probe not being in the correct position. It’s less of a risk when they have real-time guidance, but the chance of arterial puncture still exists.
Hematoma: Local haemorrhage from vessels injury due to the procedure may also occur.
Pneumothorax: While using ultrasound is safer than the traditional methods, there are certain complications which cannot be eradicated; for instance, there is a possibility of having a puncture through the lung although rare especially while performing subclavian line.
Catheter-related bloodstream infections (CRBSIs): Infections can occur if aseptic measures are not observed strictly.
Thrombosis: Central venous catheters can sometimes damage the vessel wall or are themselves a factor in the formation of a thrombus in the accessed vein with subsequent venous obstruction and embolism. This risk can be reduced by using ultrasound; however, it can never be eradicated due to vessel wall trauma.
LEARNING & CME
View All
Advanced
Cardiovascular
Life Support
Basic Life
Support

Pediatric
Advanced Life
Support

Neonatal
Resuscitation
Program

Annual Stroke
Center
Continuing
Education

Opioid and Pain
Management

National
Institutes of
Health Stroke
Scale

Basics of
Electrocardiography