


The arterial line placement for the real-time monitoring of the blood pressure and taking blood samples during critical illness or surgical procedures is a very important procedure. The radial artery is a common choice or may also be placed in other large arteries such as femoral artery. The operation is done by a board of specialists that includes anesthesiologists, emergency doctors, and intensivists. The radial artery of the forearm is a major artery which appears at the elbow and finally splits into the radial and the ulnar arteries. It disseminates throughout the forearm and hand passing at last the hand.
The kit comprises IV lines, cables, monitor setup, chlorhexidine, sterile towels, needles, lidocaine, ultrasound probe, suture material, gauze, sterile dressing, mask, cap, gown, and gloves.
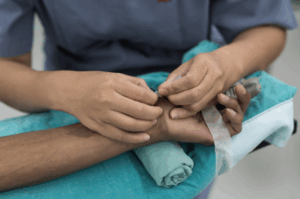
For the procedure define clear indications, make sure no contraindications exist and obtain either patient’s consent or that of a healthcare proxy. They get materials, set the transducer, perform a pause, and run Allen test. Place the patient comfortably, with their arm parallel to the ground, with the forearm supinated and the wrist dorsiflexed. Set up the sterile field, tools and insertion site, ensuring that the patient is checked on preoperatively.
Step:1 – Preparation:
Thereafter, the procedure can be started when the patient has been well placed, the timeout has been observed, and both patient and operator have been prepared according to the sterile procedures. It can be done with the help of an electric or mechanical rotary file with the assistance of an ultrasound or it can be the conventional blind approach. Besides, there are the kits for most categories like with a needle only, others with a guidewire, and even some which include the needle, guidewire, and catheter.
Step:2 – Local anesthesia:
Sensitization should be achieved by an 1 to 2 ml dose of epidural lidocaine injection.
Step:3 – Needle insertion:
when motion is not detected, the second hand is touched to the palpate the radius artery about 1-2 cm away from the wrist. Afterward, the needle will penetrate the skin at a 30- to 45-degree angle searching for a short and clear blood return. To identify the right vessel, appropriate brightness and synchronous pulsations of the blood should be seen. Once you have the flash budge a little further and go up with the thrust of the sword. At this stage, the clinician can now press the tip of the wire to about ten degrees to lead it directly into the vessels.
Arterial Line Placement
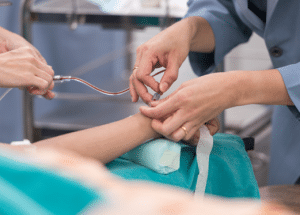
Step:4 – Guidewire placement:
At this step, the wire should be directed through the needle or catheter. Either bend the separate guidewire which could mount hide inside the needle or catheter. The removal of the needle can be done on an uncomfortable catheter or disposable needle, depending on the machinery. Apart from that, if the wire catches on the needle, reposition it and then when pulsatile blood can be seen, needle the wire in again.
Cathеtеr Ovеr Wirе
Step:5 – Confirmation and connection:
When the tip of the catheter reaches the surface of the artery, pass it along the guidewire, keeping the latter out and closing the artery for transducer configuration. After that, the wire pulled out and the catheter was kept in place to reduce the chance of catheter removal.
Step:6 – Security and Dressing:
Implant an arterial catheter with a transducer line to relax the pressure and fasten it with a suture. The sterile dressings should be applied.
The complications consist of bleeding, infection, thrombosis, pain, embolization, ischemia and AV fistula.
LEARNING & CME
View All
Advanced
Cardiovascular
Life Support

Basic Life
Support

Pediatric
Advanced Life
Support

Neonatal
Resuscitation
Program

Annual Stroke
Center
Continuing
Education

Opioid and Pain
Management

National
Institutes of
Health Stroke
Scale

Basics of
Electrocardiography